If you’re looking to add something that turns a dull backyard or commercial space into a vibe people can’t stop talking about, you’ve probably thought about water features. And let’s be real—nothing beats the look of large water feature stones for that. As a supplier who’s helped folks build everything from tiny patio fountains to massive commercial cascades for the last 7 years, I get that this project sounds way scarier than it is. Most people hear “large stone” and think it’s just heft and hauling, but the science of making it work (no leaks, no wobbly rocks, no weird moldy mess) is simpler than you’d guess. I’m gonna walk you through the whole process, no fancy jargon, just what actually works. Water Feature Stones
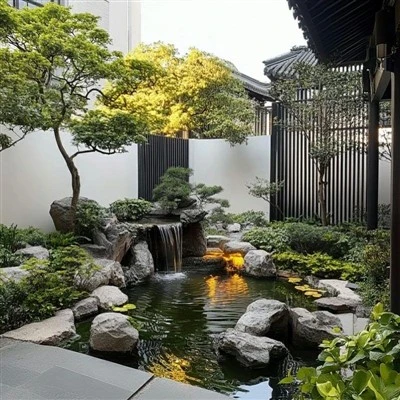
First, let’s clear up a common mix-up: not any big rock from your local landscaping lot is a water feature stone. The good ones are non-porous, dense, and can handle being submerged or wet 24/7 without falling apart. I’ve seen folks grab river rock that looked cool, only to have it crumble into sand after a month. Skip that. Stick to granite, basalt, or solid limestone—those are the only ones that hold up. They don’t leach weird chemicals into the water, either, which matters if you’re using the feature in a residential backyard with kids or fish, or a commercial space where cleanliness is non-negotiable.
Before you even touch a stone, you need to plan the base. This is where so many people mess up, and it’s the reason their feature collapses or leaks. You can’t just set a giant rock on grass or dirt and call it a day. Dig a hole that’s 6 inches wider than your final stone footprint (we’ll get to footprint soon) and 12 inches deep. Fill the bottom with 4 inches of compacted gravel—pea gravel is too soft, go for ¾ inch crushed. Tamp that down really hard with a plate compactor (or a rented tamper, if you don’t own one) so it won’t shift. Top that with a 2-inch layer of smooth sand, level it perfectly, and that’s your stable foundation. This base keeps water from pooling where it shouldn’t, and stops the stone from sinking over time. Pro tip: If you’re building a fountain that shoots water up, dig a trench for the pump’s power cord before you lay the gravel—you don’t want to cut a trench later and mess up your base.
Next, choose the right large stone for your space. This isn’t a “bigger is better” game. Small backyards don’t need a 3,000-pound boulder that overpowers the deck. Commercial plazas can handle larger ones, but you still have to match the scale. Here’s my rule: the stone’s width should be no more than ⅓ the size of your patio or space. For example, a 10×12 patio works best with a stone 3-4 feet wide. For cascades (where water runs over multiple stones), you want stones that are at least 12 inches tall each, so water doesn’t splash everywhere. Also, check the bottom of your stone: it needs a flat, stable surface where it touches the base. If it’s rounded, use a diamond blade to grind a 6×6 inch flat spot on the bottom before you set it. I know that sounds like extra work, but a wobbly stone is a mess to fix later. We offer free flat-grinding on all large water feature stones we supply, so that’s one step you can skip if you order from us.
Now the fun part—setting up the water flow. This is where you make the stone look like it’s naturally holding water, not just a rock with a hose stuck in it. For a single-stone bubbler (super popular for small spaces), you’ll cut a 2-3 inch diameter hole in the bottom of your stone, right near the flat spot. Wait, you don’t have to drill it yourself—we can do that for you, just tell us what size pump you’re using. The pump goes in a submersible basin under the stone, so it’s hidden. You connect the pump to a tube that runs up through the hole in the stone, and cap the top with a small stone or a ceramic diffuser plate (that makes the water bubble gently instead of sputtering). For a cascade, you’ll stack 2-3 large stones with gaps between them, run the pump tubing under the stones, and make sure each stone has a slight slope so water flows from the top stone down to the next. You can even add a few tiny pebbles around the flow lines to hide the tubing—no one will notice, and it looks way more organic.
Water management is the secret to making this thing last. I get questions all the time about “why does my water turn green in a week?” Most of the time, it’s not the stone—it’s the filter and pump. The pump should be sized for your water volume: rule of thumb is, your pump needs to circulate all the water in the feature every 2 hours. If your basin holds 50 gallons, get a pump that moves at least 25 gallons per hour? Wait, no—wait, 50 gallons, so 50 gallons every 2 hours is 25 GPH? No, wait, that’s right, but make sure you get a pump with a pre-filter basket to catch debris (leaves, dirt, etc.) so it doesn’t clog. Clean the pre-filter once a week—super easy, just pull it out and rinse in a bucket of old water. Also, add a small amount of water clarifier or beneficial bacteria every month, especially if you have fish. No need for harsh chemicals, just keep the water moving and clean, and you’ll avoid that green slime.
When you’re placing the stone, lift it properly—don’t try to do it alone. Large water feature stones can weigh 500 pounds or more, so use a rented wheel loader or a lifting strap (never a chain, it can scratch or crack the stone). Once it’s set on the sand base, level it with a long level—if it’s not straight, even a little, the water will flow off to one side and cause a mess. After setting, fill the basin (the area under the stone, or around the cascades) with about 6 inches of water, plug in the pump, and test it. If the bubbler is sputtering, adjust the tubing until the flow is smooth. If water is splashing everywhere, add a shallow lip around the basin edge with small rocks or concrete edging.
Wait, let’s talk about common mistakes I see every single time. First, using porous stone like sandstone or shale. I’ve had customers call me panicking because their stone is cracking after a winter—porous stone absorbs water, freezes, and splits. Don’t do that. Second, not planning for power. The last thing you want is to have your feature half-built and realize you don’t have an outdoor outlet. If you don’t have one, hire an electrician to run a GFCI outlet before you start—GFCI is non-negotiable for outdoor water, it stops shocks if something goes wrong. Third, ignoring drainage. If your basin doesn’t have a way to drain old water, you’ll end up with standing water that breeds mosquitoes. Add a small drain valve to the bottom of the basin, or a line that runs to a flower bed, so you can empty it once a season to clean it.
If you’re not a DIY person, that’s totally fine. We’ve worked with landscapers, homeowners, even commercial teams to supply just the stones, or we can connect you with installers who specialize in large water feature stones. A lot of folks think building this is impossible without a crew, but if you follow these steps, it’s doable over a weekend. The biggest win? Large water feature stones don’t go out of style. You won’t get sick of a bubbling granite rock, unlike some trendy water features that look cheap in a year.
Ready to turn your space into something that feels like a retreat? Whether you’re building a small patio bubbler or a massive commercial cascade, we’ve got the stones you need—dense, non-porous, ready to drill or grind, no weird porous junk. Just reach out to us to talk through your project, get tips specific to your space, or get a quote for the right size stones.
Japanese Garden Water Basin References:
- American Society of Landscape Architects. (2022). Guidelines for Low-Maintenance Water Features.
- International Code Council. (2021). Residential Outdoor Electrical Safety Standards for Water Features.
- Natural Stone Institute. (2023. Non-Porous Stone Selection for Water Applications.
Orin International Trade Co., Ltd.
With abundant experience, we are one of the most professional water feature stones manufacturers and suppliers in China. We warmly welcome you to wholesale custom made water feature stones from our factory. If you have any enquiry about cooperation, please feel free to email us.
Address: No.3-1, Shangzhongdi Natural Village, Hexian Village, Shuangta Sub-district, Jiangshan City, Quzhou City, Zhejiang Province
E-mail: atlas@orinstone.com
WebSite: https://www.orinstone.com/
